Lets see how to connect to a Public REST API in CIS.
The REST API I have selected is the Google Maps API.
URL: http://maps.googleapis.com/maps/api/geocode/xml?address={input_address}
input_address is the input you give to the URL at run time. For Eg: Any valid address like (San Diego)
This URL has two parts the BASE URL and the OPERATION URL
From the Google Maps URL:
BASE URL: maps.googleapis.com
OPERATION URL: /maps/api/geocode/xml?address={input_address}
1. Login into CIS and click on a folder where you have write access and select New Data Source:

2. It will bring a pop-up where you can select the Data Source Adapter:
Select REST as your Data Source Adapter:

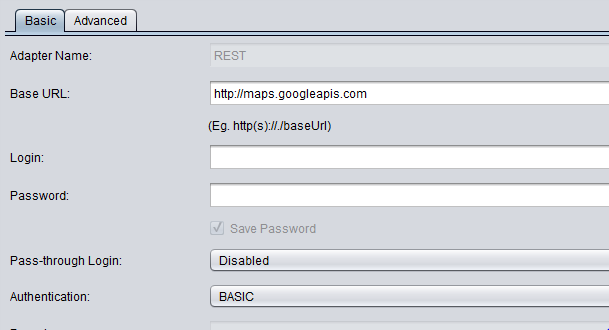
3. Click on Next at the bottom of the screen and you can enter the connection information as below.
Name: Any Valid Name. I have named mine as GOOGLE_REST_API.
Base URL: http://maps.googleapis.com
No Need to enter any Login/Password as anyone can access these Public REST API's .
4. Now in the Operations Tab Click on the + Symbol to add a new operation.

5. A window will pop-up where you enter any name for your operation. Give it any name.
6. Now enter the Operation URL in the Operation URL Text Box:
Our Operation URL: /maps/api/geocode/xml?address={input_address} and Hit Parse.
When you hit Parse it will Parse the Operation URL and detect the input parameters in the URL.

7. Hit Create and Close in the Bottom End of the Window and it will Introspect the Operation by combining the Base URL and The Operation URL.
Click on the Operation Name and Click Next

8. Hit Finish and It will introspect and give you the Introspection Task Status Report. Make sure the operation is added in the report as shown below.

9. Click OK and you can see your operation in the resource directory. Open the operation and click on Execute.

10. You have to enter a valid input_address so the Google Maps API can give you the appropriate information like Country Information, Latitude, Longitude Information etc. The Information is in XML so you can use this XML in SQL Scripts, Views and publish them for the consuming applications.
Note: If you would like to convert XML to tabular format you will have to use the XSLT Transformations provided by CIS.
The REST API I have selected is the Google Maps API.
URL: http://maps.googleapis.com/maps/api/geocode/xml?address={input_address}
input_address is the input you give to the URL at run time. For Eg: Any valid address like (San Diego)
This URL has two parts the BASE URL and the OPERATION URL
From the Google Maps URL:
BASE URL: maps.googleapis.com
OPERATION URL: /maps/api/geocode/xml?address={input_address}
1. Login into CIS and click on a folder where you have write access and select New Data Source:
2. It will bring a pop-up where you can select the Data Source Adapter:
Select REST as your Data Source Adapter:
3. Click on Next at the bottom of the screen and you can enter the connection information as below.
Name: Any Valid Name. I have named mine as GOOGLE_REST_API.
Base URL: http://maps.googleapis.com
No Need to enter any Login/Password as anyone can access these Public REST API's .

4. Now in the Operations Tab Click on the + Symbol to add a new operation.
5. A window will pop-up where you enter any name for your operation. Give it any name.
6. Now enter the Operation URL in the Operation URL Text Box:
Our Operation URL: /maps/api/geocode/xml?address={input_address} and Hit Parse.
When you hit Parse it will Parse the Operation URL and detect the input parameters in the URL.
7. Hit Create and Close in the Bottom End of the Window and it will Introspect the Operation by combining the Base URL and The Operation URL.
Click on the Operation Name and Click Next
8. Hit Finish and It will introspect and give you the Introspection Task Status Report. Make sure the operation is added in the report as shown below.
9. Click OK and you can see your operation in the resource directory. Open the operation and click on Execute.
10. You have to enter a valid input_address so the Google Maps API can give you the appropriate information like Country Information, Latitude, Longitude Information etc. The Information is in XML so you can use this XML in SQL Scripts, Views and publish them for the consuming applications.
Note: If you would like to convert XML to tabular format you will have to use the XSLT Transformations provided by CIS.


